Pages

Tuesday, April 22, 2014

Details Really Bring Your Costume to, Err…Unlife

(Bear with me, this is my first time using BlogSpot and any crashing of the internet is unintentional.)

Where to begin? Well, what's a bride without her bouquet?
Being eager to contribute, I leapt at the opportunity to acquire a bouquet for our bloody bride. In my excitement, I forgot to take pictures of the supplies, but picture a bundle of tightly budded roses, some sprigs of baby's breath and some ferns lovingly selected from the supermarket. Then deliberately left in an all-black car, parked in the sun for a few hours while I helped Bev fold tulle. Followed by being shoved in a bag, transported to the craft room, separated, shoved back in a bag when I realized that I forgot most of the stuff I needed for arranging and drying them, rushed home in rush hour traffic, thrown on a coffee table and then chewed on by cats while I napped for 11 hours. I call this technique "strategic abuse". It simulates the effect that wilting flowers would experience when being handled by hungry zombies.
After waking up from my nap, I sorta-delicately teased each of the 16 roses open and filled them with rice to keep them open and help with the drying process. Once all were opened and full, I arranged with baby's breath, fern and eucalyptus sprigs, then tied them together with butchers' twine, cut the stems and popped them in the oven to dry. There are several methods for drying flowers, ranging from hanging them for a few weeks to covering them in cat litter and microwaving them, but I found sticking them in the oven for a few hours at 100 degrees Fahrenheit gave the most natural drying appearance and fit our deadline.  
Before going in the oven:
After the oven:
 
 
As you can see from our previous posts, we had a lot of props. Groom-bits, bouquets, cattle prods.... It's a literal lot to handle. Originally the part of the groom with the ring was supposed to for our bride, Megan, to carry, but with the bouquet, she wouldn't have a hand free for any of the con stuff. And trust me, you'll want a hand free to do con stuff. Luckily our zombie-wrangler extraordinaire was able to use the extra groom piece as bait to coral us zombies. It filled in for the brain that she forgot to bring.
To keep her hands from being completely full, she hooked the prod on a carbineer clip and added it to her belt.
Beth, who had the original bride's maid dress that our dresses were fashioned out of, also had a matching bag for her purse and Bev used her built-in storage.
I'm an excitable and not-very-good-at-keeping-track-of-things person, so I hit up thrift stores the day before to find a little wallet/clutch purse that I could clip into my part of the groom:
I clipped it onto the shoe laces and it stayed put all day. It was easily removable, so I didn't have to carry the gory stump to dinner. It allowed me to have my money, phone and meds on hand, but left my "assistant" free to go wander the con.
That's what I call concealed carry. The business cards even fit in the hem, making them easily accessible.

When it comes to details, though, Beth is the master.
She not only painted her teeth, but had a bunch of hair accessories that dangled like any disheveled 'do ought to.
She also brought stick on nails for us bridesmaids and came up with the brilliant idea of leaving a few off and covering the bare nails with bits of cotton and tons of fake blood to look as if the nails had been torn off in the pursuit of brains.
Yet another thing I forgot to get a good picture of, but that's half a fake nail on my index finger, some cotton ball and a ton of blood. Extremely gorey and often the first thing people noticed when I was perusing comics in the exhibit hall. Just be sure it's all dry before touching vendor's products. Tip: you can wipe excess blood off on your dress.
Beth also stayed in character the entire time, proving that she is the ultimate badass.
For my part, I tried to add realistic details like a trailing shawl and wearing one highheel. Because what zombie manages to keep both her shoes on?
Yep. One shoe and no fucks given.


Lessons from Our First Venture:
  • You really have to commit. Because you're going to be walking out in your bloody wedding best right when the Baptist megachurch across the street is letting out of their Easter service and 150-200 church goers are going to notice after your instigator boyfriend yells, "He is risen! And hungry!" So check that anxiety about receiving strange looks and attention.
  • Hot glue works best for lightweight, dry materials. Before our next outing I'll be purchasing a staple gun and stapling the pants to the shoe so the hem hides the staples. Towards the end of the day the poor groom's stuffing was hanging out. Also, gluing the towel while it was still wet didn't work very well.
  • Business cards are the best investment. People keep catching up with us, we're making new friends, offered new opportunities and sharing all sorts of pictures because we had something tangible for people with our contact info.
  • Pay attention to what aspects you want to show off. Remember to take pictures of them in action and to document the process.


See ya'll next time (unless I get expelled from the guild for spilling all of our oops-turned-awesome secrets)!


Monday, April 21, 2014

Pieces of Groom

Yes I know this blog is late!!

So as one of the self-proclaimed talentless geek girls I was alarmed to find myself somehow responsible for organizing props for our zombie bridal party for Awesomecon (check out Kristin's blog post on our successful day!).  Our zombie groom fell through and Kristin – reminding us that we are the Geek GIRLS Guild – suggested that rather than have a walking groom, we just needed pieces of one.  We needed body parts!!  We decided on hands and feet!   

SUPPLIES

1 black men’s suit from Goodwill (to simulate tuxedo sleeves and pant legs)
1 men’s white button down shirt (left behind by an old boyfriend)
2 prop hands
1 men’s black dress shoe (thank you to the husband)
1 argyle sock (thank you Kristin)
Thermal plastic beads (get your mind out of the gutter!)
Several feet of cotton yarn (it’s sturdier to make ligament looking gore)
Metallic gold paint (for the ring)
Wash cloth (muscle gore)
Acrylic paint (blood and gore)
Fake blood (the sticky kind)

HANDS

In retrospect it may have been better to buy prop hands that were already gored up like we did with the foot.  These hands were very pink and alive looking so we had to paint them up to get them dirty and bloody.  Thank you Kristin and Megan for painting!
 
RIGHT HAND
 
LEFT HAND


  1. Cut the sleeves off the white shirt and suit jacket.  For the right hand we cut the sleeves off short – like the hand had been torn off just above the wrist.  For the left we cut them off at just above the elbow.  Shredded the ends to look like they’ve been torn – not cut by scissors.
  2. Soaked the white shirt sleeve in acrylic paint (a red, brown, and little bit of black mix; watch out for too much black as the mix can turn too purple like it did for us). 
  3. Attached the white shirt to the inside of the suit coat sleeve.  We sewed the cuff of the button down shirt to the lining in the suit coat sleeve.
  4. Hot glued the cuff of the white shirt to the wrist of the prop hand.
  5. Applied sticky blood to the prop hand and shirt cuff for extra gore.
  6. Stuffed the longer, left sleeve (right hand) with the remains of the white shirt and sew the lining in the suit coat sleeve to the stuffing.
  7. Figured out a way to put a ring on the left finger of a hand that has all the fingers fused together (lack of foresight when ordering!!!).  So we used thermal plastic beads – put them in hot water until they soften, mold them into a partial ring, applied around ring finger with hot glue, and painted gold with metallic paint!
FEET 

We were really ambitious with one but not the other!!

ONE FOOT

Slipped argyle sock over purchased zombie foot; cut holes in sock to align with already-made gashes, and applied blood to said gashes to gore it up.  I can't tell you how much it annoyed me that this was a rotting foot.  This was supposed to be a freshly torn apart groom!!  Continuity error!!!!!  Thank god we covered it with a sock.

 
OTHER FOOT/LEG

This picture doesn't do it justice!!  Rather than explain it, I drew a diagram!  Kelly did most of the hard work applying the gore!!


Check out Kristin's flickr for action shots with the props!!  Those pictures are waaaayyyyy better than my crappy cell phone pictures.  Can't wait for our next project!!
 
 
P.S.
Achievement Unlocked!  First blog post for the guild!!!


Sunday, April 20, 2014

Our Successful Cosplay Debut!

Today our Guild made its group cosplay debut as a zombie wedding party at Awesome Con and we ROCKED it. We got lots of photos taken of us and we had the chance to talk to lots of people about our group and what we do. ANNDD... we won Most Creative in the group cosplay contest! They actually made the category for us which was pretty amazing and flattering. The audience loved us, we got lots of laughs and applause which so made it worth the aching backs and pure exhaustion. Speaking of....

Here was our morning makeup session which surprisingly ended up taking as long as I estimated: 3 hours for the 4 makeup jobs and then throwing my own costume on. We left on time! It was a miracle!

Here are the bite imprints I made awhile ago, finally making their way onto Beverly's arm.


Beth needed a lot of blending paste but her custom made cheek and the scratches I made from a ready mold turned out pretty amazing. I highly recommend the blending paste for edges. The cheek was pretty badass, I just molded it with clay using fake nails as teeth, made a mold out of Fantastic Plastic, poured in the liquid latex, and painted the teeth. I made the torn skin over it separately with a couple layers of tissue and latex that I glued over it and tore open leaving a little bit attached still. Once bloodied up it looked pretty damn amazing:


I used both the drippy stage blood and blood paste to give it some nastiness. Beth also used some tooth paint to get her actual teeth to match these. That's some dedication.


And here we have Kelly pre-gored......... and Megan post gore! Kelly's jugular wound, Beth's cheek I custom sculpted and molded myself while the forehead wounds on Kelly and Megan are both from mold trays I bought and were painted by the group one night when I showed them how to make and paint our own latex appliances.


Here I am as a no-gore zombie herder because another makeup to do was not really at the top of my list and Beverly already had 3 bridesmaid dresses to make. Notice my handy dandy cattle prod which is made of moldable plastic for the prongs, a marshmallow roaster for the base, and pieces of a toy lightsaber kit glued and painted (The white tie lets con organizers know my "weapon" was cleared). My little thigh holster pack was where I kept all of the extra blood, tooth paint, and blending supplies needed to keep my zombies looking not so fresh.


The beautiful bridesmaid dresses were actually made from an old dress of Beth's that Beverly took apart and turned into 3 bodices. She made the skirts out of tulle over a shell and tied them off with a sash.  While Bev may think twice about ever again using the nightmare that is tulle they definitely turned out as lovely dresses perfectly fit for a zombie wedding.
 Notice the lovely bits of groom they're munching on? The original hands and one foot were purchased off Amazon and after some paint, gore, and a Goodwill suit they turned into the remnants of a well meaning groom. Kelly bloodied her leg snack with yarn and torn old towels and Kelly made the groom's ring out of moldable plastic. All in all these props ended up being pretty awesome and not too expensive.


The ladies worked the crowd like proper zombies and I kept them in line with my prod and the a bit of the groom. We made sure to have a "bit" and it really made people laugh to see us in character hamming it up. Otherwise it'd be a bunch of bloodied ladies standing around with some weird chick in black.


Check out the tons of photos we took of ourselves here if you just can't get enough of the zombie bridal party. Luckily we had a just amazing wedding photographer (aka boyfriend Nirmal) who was willing to spend all day taking photos of our ridiculousness. We decided not to eat him.


Lessons Learned From this Project:
*A simple idea can quickly turn into a full on group cosplay when creative minds fueled with some wine start throwing in ideas and expanding on them. 
*Details make it funny, people will notice.
*Use what you have lying around whether its a bridal gown or plastic lightsaber pieces. It's amazing what some paint can do to turn it into something awesome.
*Try, fail, try again. If you don't try things out- whether its making body parts, sewing, or making your own prosthetic molds- you will never know what you're capable of. It's amazing what a confidence booster it is when something turns out better than you expected.
*We are stronger together than solo.
*It's easy to have a meltdown if you bite off more than you can chew so work with your team to make sure nobody loses their mind. You learn something and nobody gets hurt.


Well..... 

Somebody may still get hurt if you don't make sure there are enough protein bars in your bag to keep everybody from getting hangry....

Saturday, April 19, 2014

Awesome Con DC Day 1

Some of the ladies hit up Awesome Con in DC today and got a chance to check out some amazing cosplay.

Holy lines, Batman!

The con was pretty chaotic so we managed to only get in one panel on Budget Cosplay (natch) but we did plenty of people watching, some game playing with our new Guildies- Lesley and Hunter (our first male geek girl, we don't discriminate!), and art buying because none of us will ever have enough geeky decor. 


We saw some pretty impressive costumes and if anything it just made us more excited for tomorrow's group contest. The Steampunk Family who hosted the panel we went to really nailed it when they talked about the importance of working with people you can learn from and sharing those skills to make you even better as not just an individual but also a team. We couldn't have gorgeous dresses to wear tomorrow without Beverly, we have so much to learn from her when it comes to sewing. Beth and Kelly who claimed to be short on talent have really stepped up and learned how to make some awesome props (oh you shall see soon enough!). As a team we really have the chance to bring our projects to a whole new level ala 90's Grrl Power. 

Here are just some of the great ladies of DC cosplay we saw today:


There was a lot of talent on display and it was especially great to see the young girls out there really bringing it as the next generation of Geek Girls. And special props to this little girl who didn't see why she couldn't be Superman and to her dad for agreeing:


Geek Girl pride is all about having fun by indulging in what you love and showing your skills. Check out the rest of the photos we took here and come say hi to us as we roam Awesome Con Sunday!

Sunday, April 13, 2014

Preparing for the Big Day

So the Geek Girls have been hard at work preparing for Awesome Con next weekend. We have a bride, 3 bridesmaids, a wedding photographer, and a groom. Well... parts of a groom.
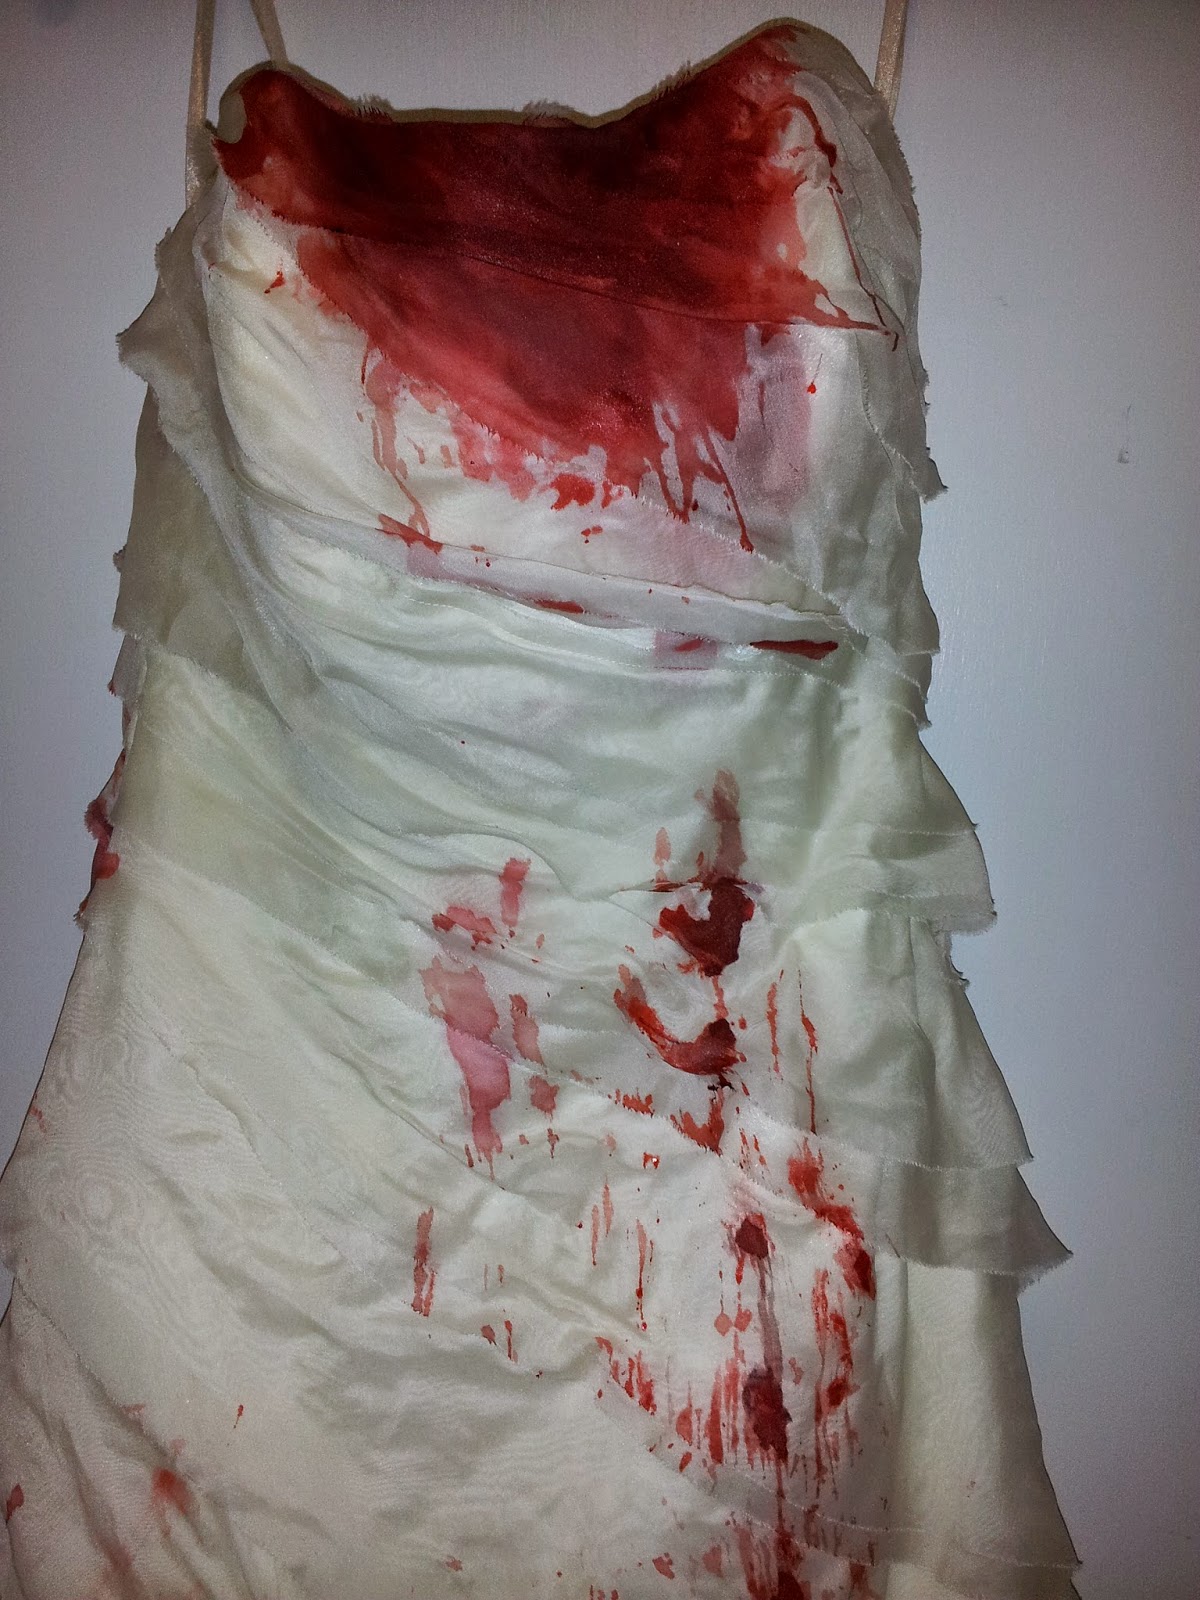
Megan bravely offered up to be the bride and find a new life for her wedding dress. A walk around the dirty streets of DC, a wrestling match with the dogs, and a dip in a bathtub full of coffee started to bring it a new look (and looks from the people at Union Market):

Who doesn't shop like this?

So at our latest project night was all about going from the decayed bride to bloody bride. First, a dose of liquid courage was in order.


And then a little liquid life (DISCLAIMER: No ex-husbands were harmed in the making of this dress). I watered down some Ben Nye fake blood so it would drip well and use a spoon to start so I could get the top of her dress saturated where I wanted it to start.

Yeah, she likes it.

A very cool thing about this dress is that the layers of fabric let the blood drip in unexpected ways so it followed the creases and made some nice splatters. We wanted the effect of her taking a bloody bite out of someone and the blood dripping down from her mouth. I also took globs of blood soaked rolled cotton and let them ooze down the dress as well. Really, there's probably no wrong way to do it.


Next we decided to add wound drips from a gnarly scar ( the result of an unfortunate body casting incident with "safety" scissors) so we could pretty up the back of the dress too.


I didn't want the blood to be single toned so I mixed up some acrylic paint- red, some brown, a drop of black; and then watered it down a bit before going over some of the splatter spots. This gave it more of an old blood look and because the watered down blood was still wet it soaked and blended really nicely. 


And of course our blushing bride would make a bit of a mess walking through her carnage so we made sure her train got the gory treatment as well. I basically just dipped the edges into my bowl of watery blood and let them seep up the dress.

That is one sexy dress.

And our wedding gown is complete! Megan is now a bride not to be messed with:


But of course, that could be said about the whole Guild: