
Work With What You've Got
I’m lucky enough to live in an old house with a bit of
ambiance that lends itself to a spooky atmosphere perfect for Halloween (it
might be one of the reasons I live there). I realize not everyone has the
benefit of fireplaces, creaky stairs, or even multiple rooms to get that
haunted house look. If you've got a cookie cutter studio apartment that is
sparsely decorated then think of an old mental asylum or doctor’s lab. If
you’re in a house that hasn't been remodeled since the 70’s then you've got
yourself a Murder at the Disco theme waiting to happen. Standard American
suburban home? Why not turn it into a Housewife/ Pod Person abode. By working
with your home’s look you’ll save yourself money because you won’t be trying to
cover up what you already have.
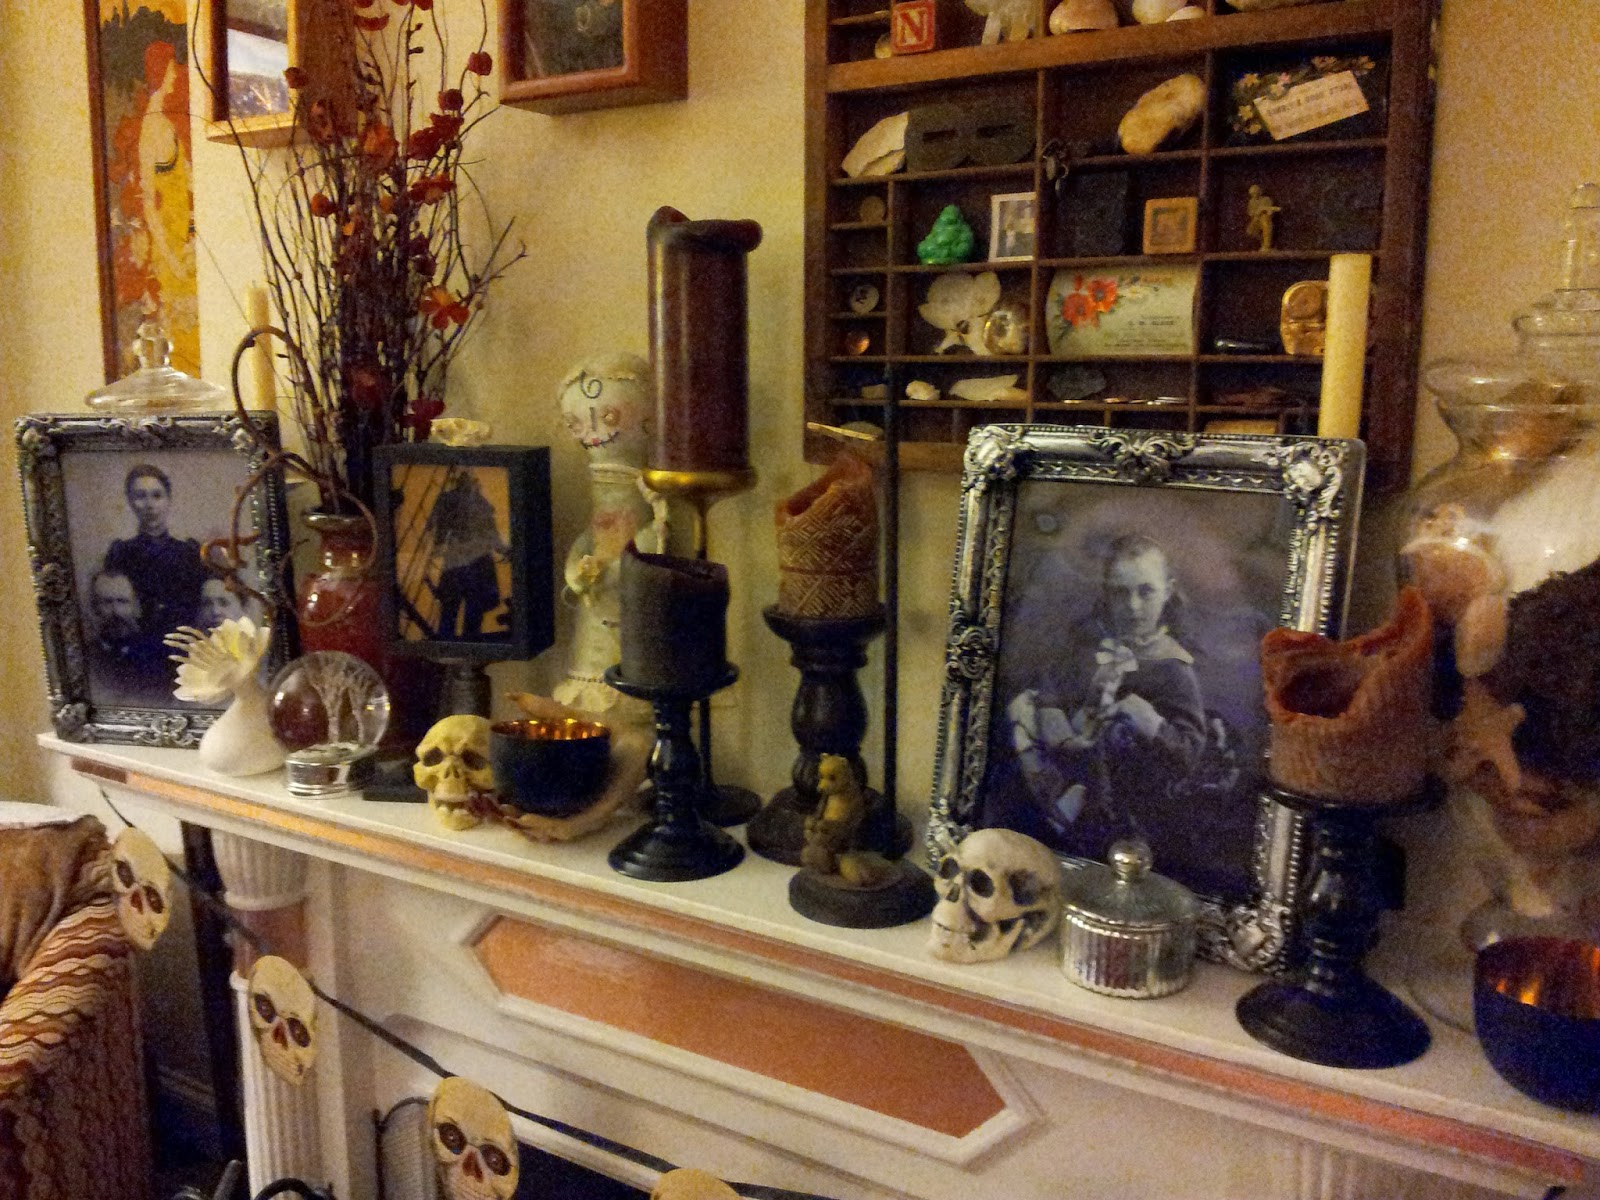 I fully admit I’ve got a bit of Cabinet of Curiosities look
going on in my living room so I’ve already got an edge on Halloween. I’ve had
several people go “this looks great!” then look around with narrowed eyes and
say “wait… how much of this is up year round?” Busted. But I was inspired by
Clue and the first season of American Horror Story to tweak my place into a creepy
party venue with some scraps of velvet and lace on my side and coffee tables
and putting my old ancestral photos in a more prominent position next to some
candles. I also took some of my art and photos out of their frames and put in
those creepy photos that change from a Victorian lady into a freaky zombie when
you take a couple steps to the side. A cheap Ouija board and some old books put
out and it was quite the creepy parlor.
I fully admit I’ve got a bit of Cabinet of Curiosities look
going on in my living room so I’ve already got an edge on Halloween. I’ve had
several people go “this looks great!” then look around with narrowed eyes and
say “wait… how much of this is up year round?” Busted. But I was inspired by
Clue and the first season of American Horror Story to tweak my place into a creepy
party venue with some scraps of velvet and lace on my side and coffee tables
and putting my old ancestral photos in a more prominent position next to some
candles. I also took some of my art and photos out of their frames and put in
those creepy photos that change from a Victorian lady into a freaky zombie when
you take a couple steps to the side. A cheap Ouija board and some old books put
out and it was quite the creepy parlor.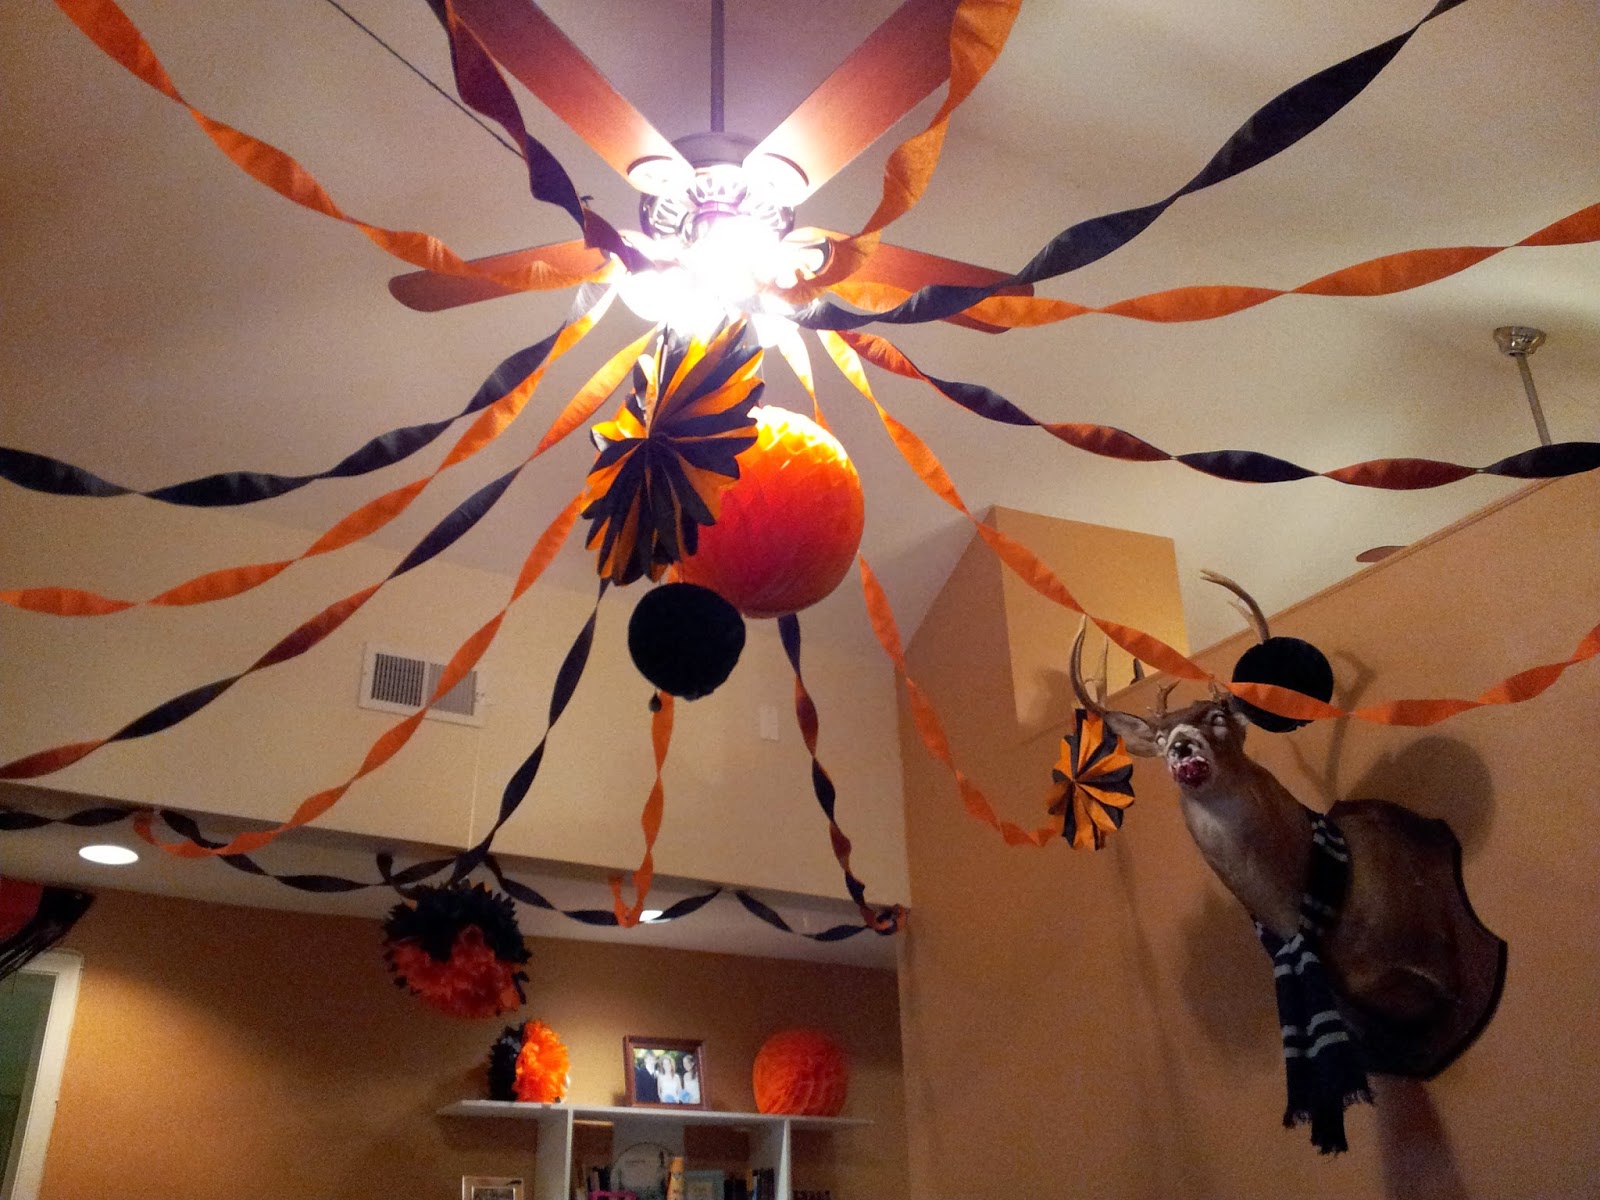 Now my neighbors who I co-hosted with have a much different
taste in décor than I do. Not only did they have a more modern design to their
space but they had overstuffed leather furniture and a deer head on the wall. Since
their space was much more open and sparse, they didn’t like scary things, and
it was not my turf, all I could think of was that it looks like a school dance
auditorium with the harsh overhead lights and high ceilings at odd angles (plus
they were dressing up as characters from Grease. Sigh… I know). So I worked the
orange and black streamers with those hanging crepe fans and globes. I did take
some license with the deer head though...
Now my neighbors who I co-hosted with have a much different
taste in décor than I do. Not only did they have a more modern design to their
space but they had overstuffed leather furniture and a deer head on the wall. Since
their space was much more open and sparse, they didn’t like scary things, and
it was not my turf, all I could think of was that it looks like a school dance
auditorium with the harsh overhead lights and high ceilings at odd angles (plus
they were dressing up as characters from Grease. Sigh… I know). So I worked the
orange and black streamers with those hanging crepe fans and globes. I did take
some license with the deer head though...
If You Can’t Make It,
Invest In It
 Don’t buy cheap crap. It not only looks bad but it will be
junk by the end of your party and more stuff to throw into a landfill. By
making my own decorations with what I have and buying decorations that aren't
going to fall apart after one use I've managed to save money in the long run. I've
been recycling a lot of the same decorations over the past several years for
holiday parties because they hold up in storage. It may seem more cost
effective to buy the cheap party in a box but a decent chunk will probably
already be broken or torn when you put it up and it will be useless at the end
of the night. Hit up stores after the holiday to prepare for next year or get
yourself a Pinterest account and learn how to take what you have, throw some
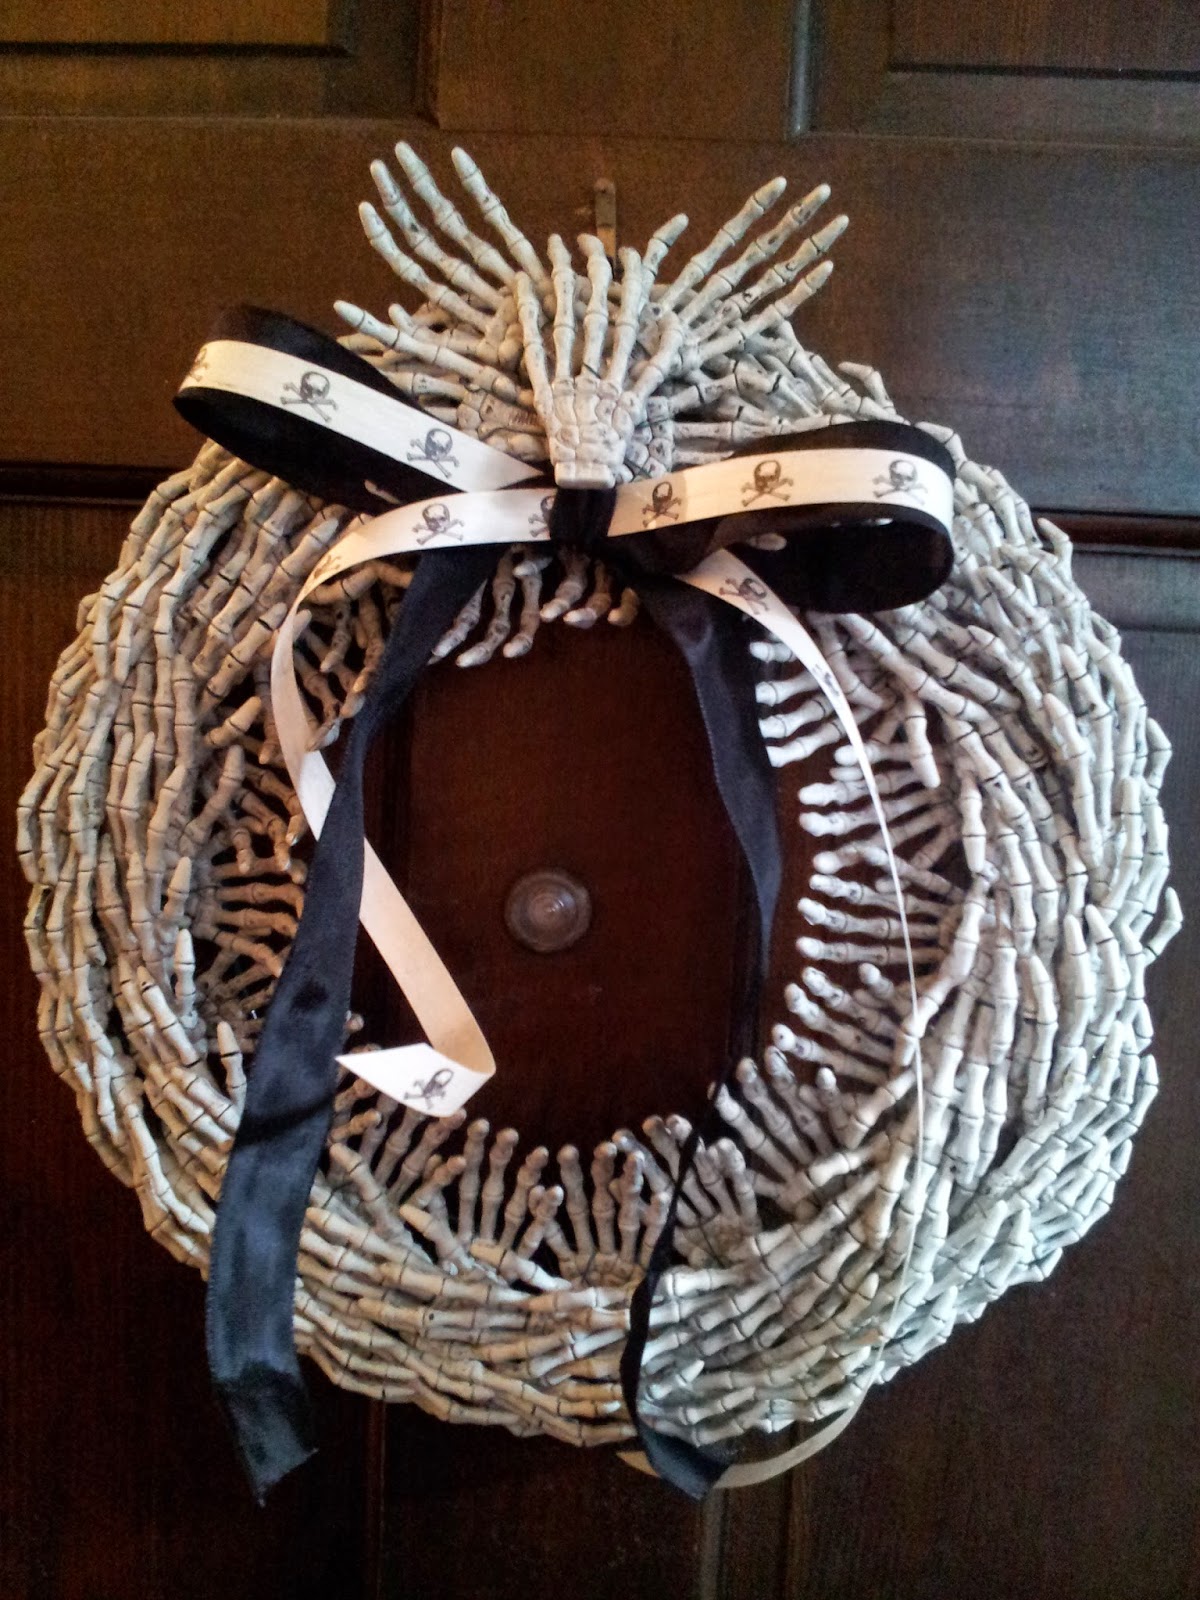
paint on it, and look like Martha Stewart. This wreath is made out of cheap skeleton hands that came in giant packs, florist wire, and a wreath frame. Cheap, sturdy, and looks pretty cool.
Don’t buy cheap crap. It not only looks bad but it will be
junk by the end of your party and more stuff to throw into a landfill. By
making my own decorations with what I have and buying decorations that aren't
going to fall apart after one use I've managed to save money in the long run. I've
been recycling a lot of the same decorations over the past several years for
holiday parties because they hold up in storage. It may seem more cost
effective to buy the cheap party in a box but a decent chunk will probably
already be broken or torn when you put it up and it will be useless at the end
of the night. Hit up stores after the holiday to prepare for next year or get
yourself a Pinterest account and learn how to take what you have, throw some
paint on it, and look like Martha Stewart. This wreath is made out of cheap skeleton hands that came in giant packs, florist wire, and a wreath frame. Cheap, sturdy, and looks pretty cool.
The Devil Is In the
Details: A Taxidermy Tutorial
It's the little things that count. Whether it's throwing a creepy old silent movie onto your TV or putting some severed fingers around the dog bowl you shouldn't ignore the things that might detract from your ambiance. Embrace that elephant in the room. Even if its actually a deer.
Now the deer head in my neighbors' apartment could not just remain looking on so
sorrowfully, that poor creature needed a Halloween reboot. I took a page
out of Evil Dead and went to work under strict instructions that nothing could
be permanent. As if that was going to stop me.
First I made Clyde (yep, they
named him) some new eyes by just taking some tissue, tearing it to his eyeball
size and wetting it. The wet tissue stuck to the glass eyes and when they dried
they were a freaky milky white.
Next he needed to seem a bit more terrifying so
he got a new jaw that would be far more intimidating. I started by taking some
mesh wire sheets and molding around his existing jaw. That became his new upper
jaw and I used the mesh to make a new lower jaw. I covered both in plaster
strips and let them dry.
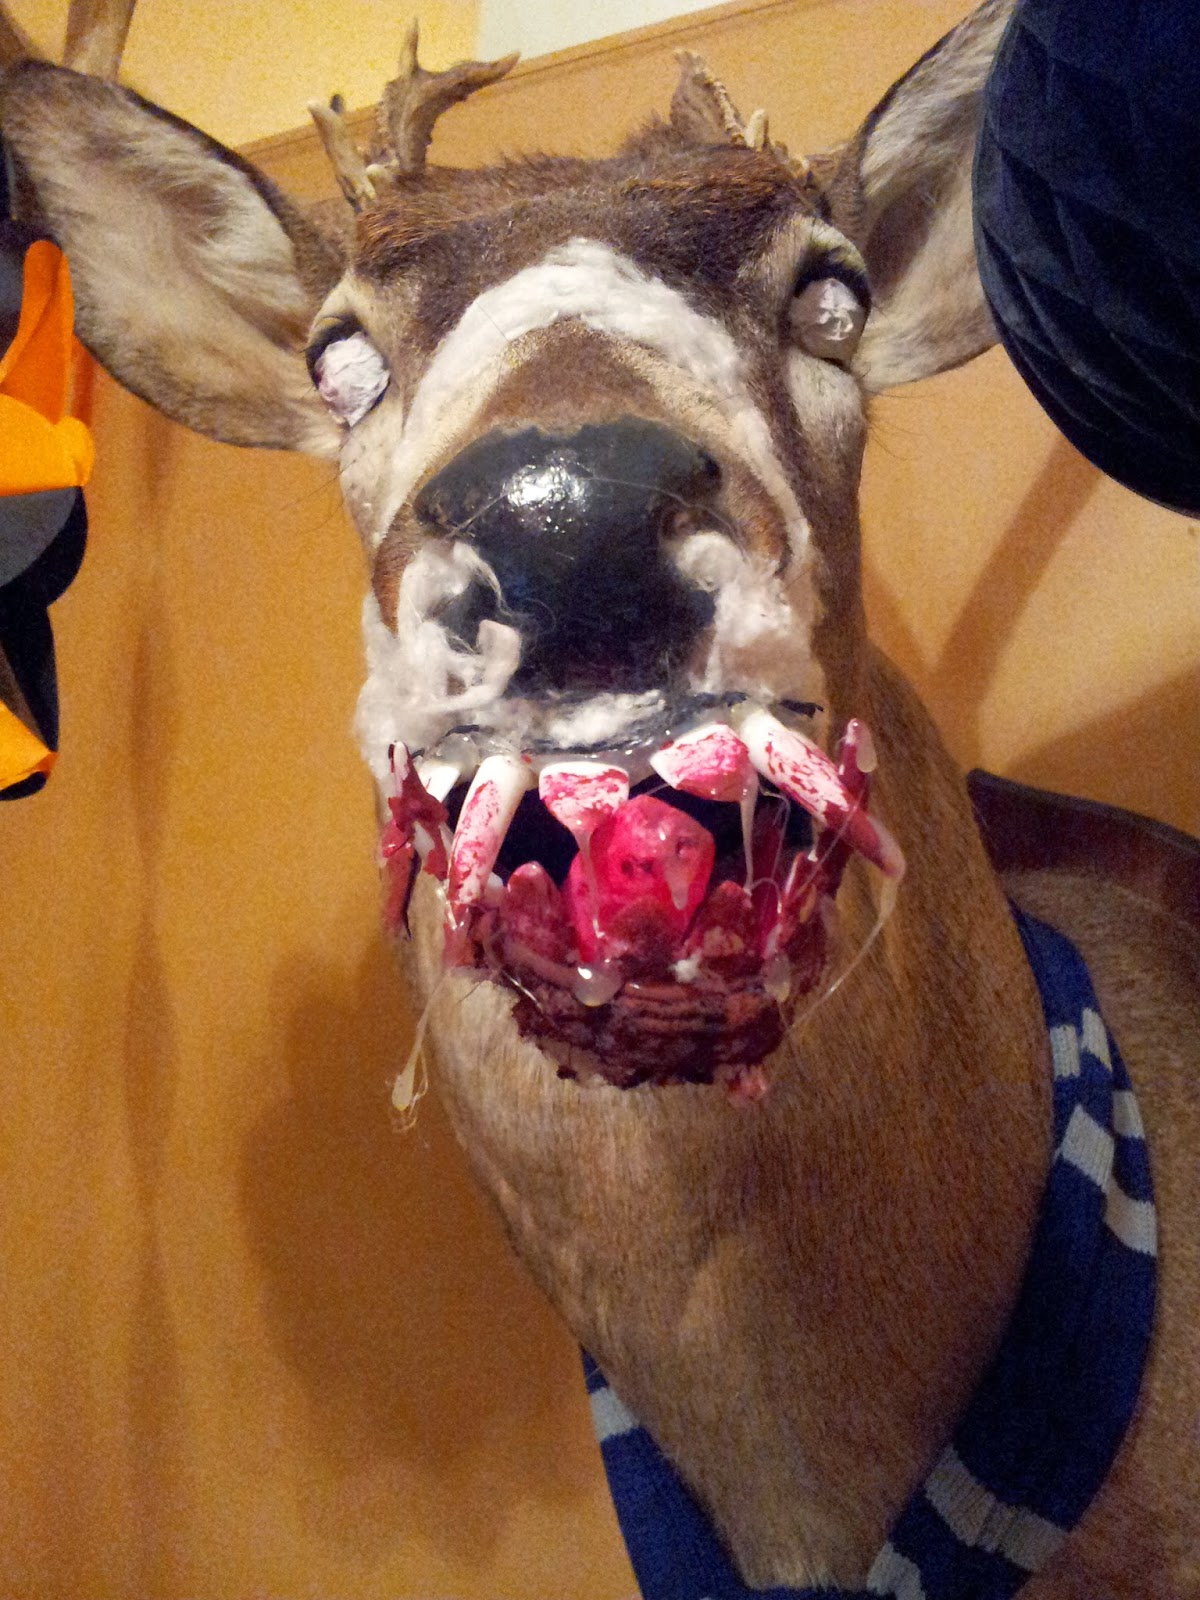.jpg) Clyde needed to look even more intimidating so he
got a new set of teeth that were actually from a cheap jack-o-lantern kit. I
trimmed off the bits that were meant to be screwed into the pumpkin and hot
glued them at odd angles in his mouth so he had a ferocious looking snarl. I
couldn’t stop there so I cut the thumb off a latex glove, rolled up the rest of
the glove and stuffed it into the thumb. A little pink paint and I had myself a
deer tongue.
Clyde needed to look even more intimidating so he
got a new set of teeth that were actually from a cheap jack-o-lantern kit. I
trimmed off the bits that were meant to be screwed into the pumpkin and hot
glued them at odd angles in his mouth so he had a ferocious looking snarl. I
couldn’t stop there so I cut the thumb off a latex glove, rolled up the rest of
the glove and stuffed it into the thumb. A little pink paint and I had myself a
deer tongue.
You know that nasty dish of sticky, flesh-colored wax you get in
Halloween makeup kits that you don’t know what to do with? Well I finally found
use for it by smearing the bottom of Clyde’s new jaw with and then rubbing
rolled cotton over it. It stuck in tufts and made a very nice fuzzy chin.

Next I went to town with some red paint and using the hot glue to make drool drips. It was looking quite freaky but then I had to figure out how to attach it without messing up the deer (ironic, no?). With a couple rubberbands I was able to get the new mouth to hold against the muzzle but the bands were noticeable across the bridge of his nose. I took more rolled cotton and gave Clyde some frothing that came out of his nose and back over the rubberbands. It blended in perfectly and Clyde had a whole new look perfect for Halloween without breaking the bank or ruining his face.
Next I went to town with some red paint and using the hot glue to make drool drips. It was looking quite freaky but then I had to figure out how to attach it without messing up the deer (ironic, no?). With a couple rubberbands I was able to get the new mouth to hold against the muzzle but the bands were noticeable across the bridge of his nose. I took more rolled cotton and gave Clyde some frothing that came out of his nose and back over the rubberbands. It blended in perfectly and Clyde had a whole new look perfect for Halloween without breaking the bank or ruining his face.
Fake It With Lighting
 Nothing can ruin a look more than bad lighting. When was the
last time you were on a haunted house tour that was brightly lit with
fluorescent lights or those big globes? Of course not, part of the scare is the
lack of light and exaggerated shadows. My rule is there is to be little to no
regular lighting during my Halloween parties. Flameless candles, tinted bulbs,
glowsticks and LED light strips are what made my place come to life.
Nothing can ruin a look more than bad lighting. When was the
last time you were on a haunted house tour that was brightly lit with
fluorescent lights or those big globes? Of course not, part of the scare is the
lack of light and exaggerated shadows. My rule is there is to be little to no
regular lighting during my Halloween parties. Flameless candles, tinted bulbs,
glowsticks and LED light strips are what made my place come to life.For Xmas and New Years I put some amber tinted bulbs in my living room, they had a very soft light and helped create the more natural but warm light I wanted in there. I wanted it to have a glow that you’d get from lots of candles without having to worry about guests setting themselves on fire so I got a lot of those flameless candles which can go from cheap one time use tealights to pretty fancy flickering ones on timers.
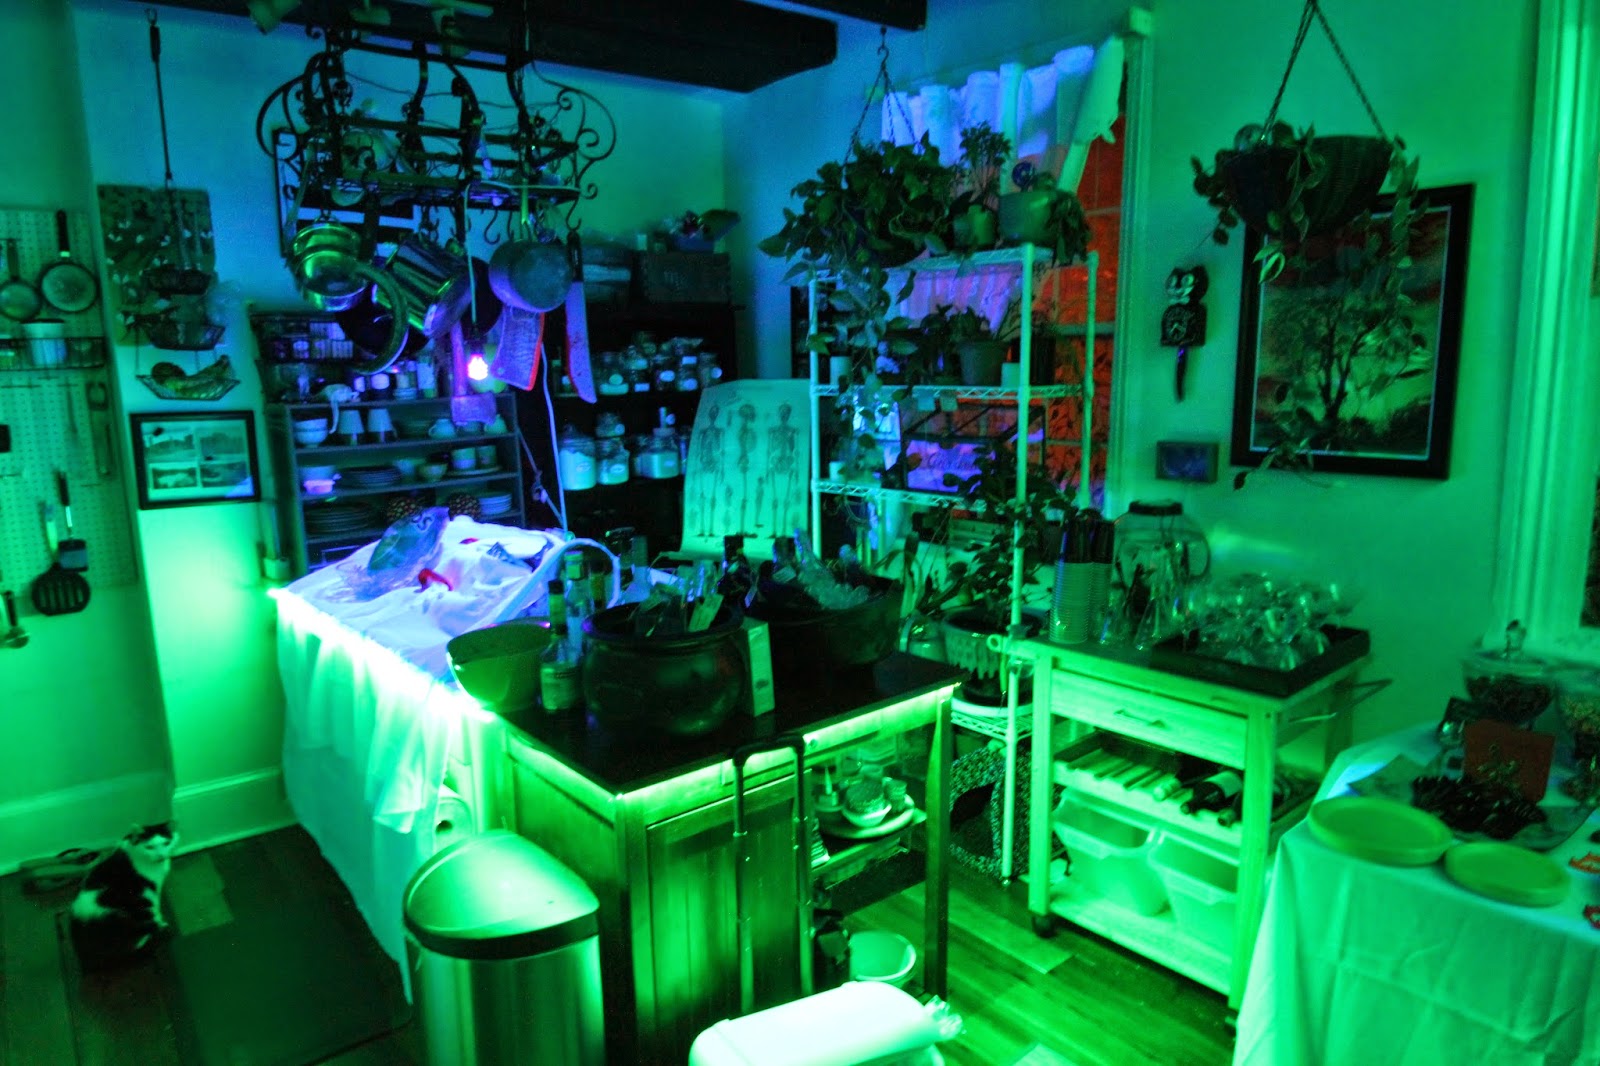 For Halloween it was all about the shadows and creepy colors. I stuck glowsticks everywhere outside. In the bushes, in
between pumpkins and in the mailboxes. They go great in corners where your
other lighting won’t quite reach. Plus they can give off some impressive
shadows that you can’t get with bright lights. I also found LED lightstrips to be my best friend. Put under
tables, under moldings or behind furniture gave a very nice glow and when run
along the floor the upwards light gave everyone a very creepy look. I managed
to get them in just about every room, I went a little crazy. But there is no
denying they are what made my place go from good to fantastic. My kitchen could
not have turned into a mad scientist lab without the blacklight making the
autopsy sheets glow and the green LED strip running under the counter below the
sheets. The kitchen was my pride and joy last year!
For Halloween it was all about the shadows and creepy colors. I stuck glowsticks everywhere outside. In the bushes, in
between pumpkins and in the mailboxes. They go great in corners where your
other lighting won’t quite reach. Plus they can give off some impressive
shadows that you can’t get with bright lights. I also found LED lightstrips to be my best friend. Put under
tables, under moldings or behind furniture gave a very nice glow and when run
along the floor the upwards light gave everyone a very creepy look. I managed
to get them in just about every room, I went a little crazy. But there is no
denying they are what made my place go from good to fantastic. My kitchen could
not have turned into a mad scientist lab without the blacklight making the
autopsy sheets glow and the green LED strip running under the counter below the
sheets. The kitchen was my pride and joy last year!Don’t Forget The Food and Drink!
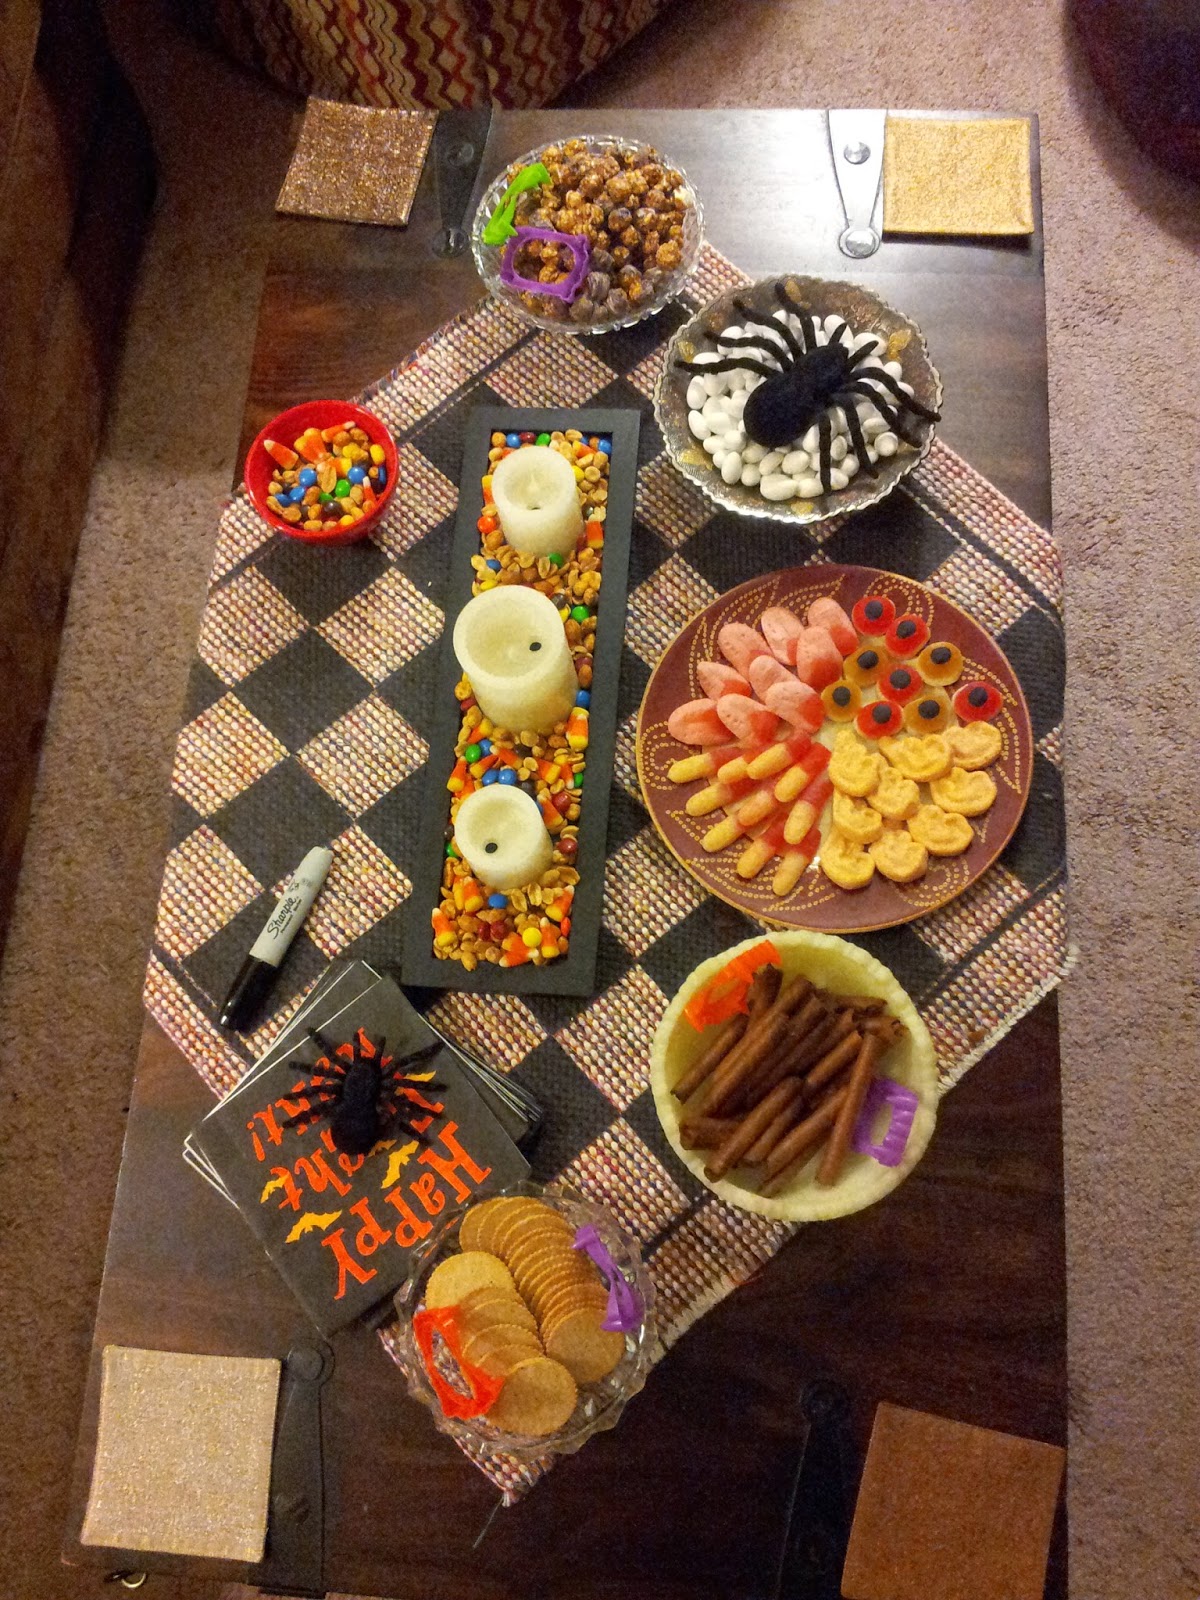 What’s a party without food? Not one you’ll get many people
to. My rules for party foods are: stuff that doesn’t require utensils, won’t
get stale easily, can be made ahead, and covers sweet, salty, spicy and savory.
It doesn’t have to be catered or super expensive (go to places like Ross for
gourmet snacks that are crazy cheap). My recommendation is to buy ½ stuff you
can dump straight out of the bag into a bowl (candy corn mixed with peanuts are
a huge sweet and salty hit) and the other half can be varying levels of stuff
that requires some effort whether it’s the presentation or just making the
food. Let’s face it, it’s dark, people
are tipsy, and nobody was going to know that I didn't make the salsa but they
sure remembered that it was served out of a clown head.
What’s a party without food? Not one you’ll get many people
to. My rules for party foods are: stuff that doesn’t require utensils, won’t
get stale easily, can be made ahead, and covers sweet, salty, spicy and savory.
It doesn’t have to be catered or super expensive (go to places like Ross for
gourmet snacks that are crazy cheap). My recommendation is to buy ½ stuff you
can dump straight out of the bag into a bowl (candy corn mixed with peanuts are
a huge sweet and salty hit) and the other half can be varying levels of stuff
that requires some effort whether it’s the presentation or just making the
food. Let’s face it, it’s dark, people
are tipsy, and nobody was going to know that I didn't make the salsa but they
sure remembered that it was served out of a clown head.
I did a lot of scouring the internet for Halloween recipes
and had mixed results. There was a lot of typical party food like regular mini
burgers that were just called “Spooky Burgers”. Gimme a break. I was looking
for something a little more than the usual with some traditional foods thrown
in. I did find a recipe for eyeball cakepops, they were a hit but a pain in the
ass to make. Hot white chocolate drips and burns. Sugar cookies are a little
time consuming but with Jack O Lantern or Star Wars cookie cutters people will
be impressed, even if you let your child (or grown adult boyfriend) decorate
them with sprinkles and colored frosting. After trying some tedious recipes I
have turned to the simple ones to avoid stressing out. It’s no fun being
exhausted and stressed at your own party.For Halloween I had a recipe for
some really spicy mixed nuts that became demon scabs, puppy chow covered in powdered
sugar became ghost poop (metallic pens on black paper make great labels) and I
could make them a few days ahead without much effort.
My Star Wars party centerpiece, Pièce de résistance if you will, was the most decadent Han Solo ever. Carbonite never tasted so good.

My Star Wars party centerpiece, Pièce de résistance if you will, was the most decadent Han Solo ever. Carbonite never tasted so good.

Presentation is what mattered when I made a Sarlaac pit out of hummus for my Star Wars party just by cutting a hole in the bottom of an overturned plastic bowl and fitting it to a cut off plastic cup that made the pit. I stuck some tooth picks through the cup so they pointed in like the sarlaac “teeth” and covered the rest in hummus. With some mini Return of the Jedi figures on triangle cut chips as skiffs it was pretty good and everyone got a kick out of it.

On the plate next to it was Jabba the Guac, nothing more than my plastic Jabba toy sitting in a bed of guacamole with some running down his face for good measure. It was gross and people loved it even though all I was really serving was guacamole and hummus.
Themed drinks have become key to my parties, I think at this point people would be pretty bummed if I didn’t have them. By pre-making cocktails and pouring them into some labeled bottles nobody has to be a bartender and there’s something besides wine and beer. For my Mayan Apocalypse Holiday Party we had some candy cane cocktails as well as spicy Mexican hot chocolate for the DDs. For Halloween we’ve made candy themed cocktails: the Gummy Bear, Thin Mintini and Snickertini. One guest drained a bottle of a red colored cocktail called Vampire’s Kiss and declared it the best party ever. There are tons of drink recipes online for any kind of party theme you can imagine, go crazy. Just don’t forget to make something for the people not drinking and warn others if your cocktails are stronger than they seem (I had to snatch a deceivingly strong thin mintini out of the hand of a pregnant friend before her baby turned creme de menthe green).
So these are my most basic theme party tips to get you thinking. As I ramp up
for Halloween in the next couple months I’ll post more on this year’s projects and ventures as well as a tutorial on making an Evil Clown Autopsy Buffet. Yep, you read that correctly.
Kristin
(aka Geek Girl Friday)