Last week summer became fall and in a few days it will be October which of course means Halloween prep has begun! Last year was the Creepy Doll Tea Party which I didn't think I could beat and frankly I wasn't sure I was up for trying. But I guess the spirit of the Great Pumpkin has filled me with the motivation to throw a Freak Show Carnival this year. With American Horror Story and Twisty the Clown giving me some inspiration, boxes from Amazon have been showing up almost daily delivering the makings of what will hopefully be our best Halloween party yet. For the next month I'll be blogging the progress as we ramp up for our annual extravaganza.
Our neighbors who did a joint party with us the past couple years moved out so this year the party is going to be in my place only. Now since my apartment isn't big and it's pretty full this means I need to utilize every square foot I can. Last year the critters were gated in my bedroom but this year they're going to be gated on the stairs and the bedroom is going to have to be used as party space. A couple years ago I left it open with a few chairs thinking it might be a nice place for a some people to sit and chat where it was quieter but to my great surprise over a dozen people crammed into my bedroom to play a rousing game of Cards Against Humanity while the living room sat practically empty.
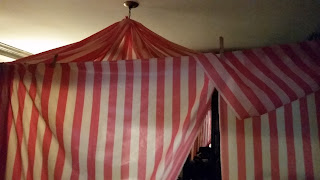
Now that the bf has basically moved in we've got a lot of stuff we keep on our dressers and frankly having friends-of-friends and coworkers hanging in my boudoir and seeing what kind of deodorant and foundation I use makes me a bit squeamish. A lady needs a few secrets after all. So how can I keep with the theme of a carnival and keep our personals out of sight? By covering it all with a big top tent of course.
So if you're in need of sectioning off part of a room for your party follow along to learn how to make your own makeshift tent.
How to Build a Big Top Tent
What You'll Need
2 to 3 rolls of a lightweight plastic table cloth (make sure the stripes go the long way)
A length of clothesline cord
Clothespins
Scotch tape
Scissors
Command hooks if needed
 |
| Clothespins at the ready |
 |
| Roll of tablecloth and some clothesline |
I like to make a game plan so I don't waste my time or resources on mistakes. The first thing I did was sketch out my room and decided where I wanted the tent borders to be. Basically everything would be covered except my bed and drafting table. This gave me an idea of where I would need to tie my clotheslines.
 |
| Work smarter, not harder |
String the Clothesline
During my post-college-dirt-poor years the thought of spending $2 on drying a load of clothes was inconceivable so I invested in a sturdy clothesline to string around my apartment. Clothesline is friggin great; it doesn't sag much, the knots don't slip, and they're easy to untie. I went low tech McGuyver by tying an end on doorknobs, pulling it over the top of a door and then stringing it across the room to to tie around another door's hinge. Use what you can; sturdy curtain rods, knobs, hinges, etc so that putting up hooks is a last resort.
 |
| Clothesline going around a closet hinge |
 |
| Clothesline trailing over the top a door with another attached to it |
Find Your Center
Lucky for me I have an ugly chandelier in the middle of my room that I can tie the panels to. Most rooms have some kind of light fixture in the middle of the ceiling but if yours is more flimsy or non-existent then I'd suggest putting up some sturdy Command hooks, two or three positioned so the tips of the hooks are towards the middle. If you have a popcorn ceiling...you might be S.O.L. They're hard to drill into and nothing will stick to them. You might have to string line across the room and drape the panels over that.
 |
| Command hook pattern for your ceiling |
Line Up Your First Panel
Unfold your tablecloth and roll out a good amount of length. Gather the end and tie it with a length of clothes line about 18-24 inches long. Attach it to your room center and trail the panel over the clothesline. You want the panel to hang vertically but chances are one side of the panel has further to go than the other to get from your center to the clothesline and it might hang crooked so you'll need alter it a bit. Gather up some slack on the outside and fold it over so that the panel hangs straight and use your clothespins to hold it in place. Cut the panel so it skims the floor.
 |
| Pin on the outside |
 |
| An even drape and hanging straight |
The Rest of the Panels
Work in a circle so the panels will all be even with each other. You are going to again gather an end and tie it with the same length of cord as the first panel so they are right next to each other.
 |
| Tie the next gather right next to the previous |
 |
| Gathered ends tied to room center |
 |
| Building out the panels |
Creating An Entry
Depending on how you run your line you might have a gap between the perimeter of your tent and your door, giving your guests the ugly outside view of your tent.
 |
| Outside view of tent from the door |
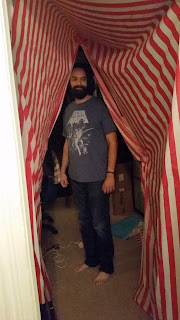
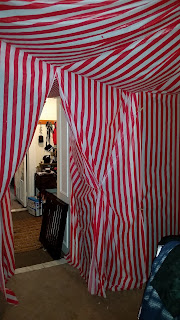
I took a length of the table cloth and made an archway lined up with the panels I pulled to the side for the entry. I again used clothespins along the line but had to use tape to attach it around the door frame. It gave me a little tunnel and kept the tent consistent from the door in.
 |
| View to the inside now has a tunnel |
 |
| View to the outside |
Securing the Bottom and Edges
During your party you don't want your panels to get stepped on and drag your whole tent down so make sure they aren't too long and when you can, secure them by taping them under your dresser, door, whatever to make sure the ends don't drag. You can also tape the edges together once you're done and remove the clothespins so you have to gaps or ways for your illusion to be ruined by those that always feel the need to peek behind the curtain..
 |
| Loose edges could mean an early demise to your big top! |
Final Touches
Since we're going scary freak show vs kiddie birthday you'll probably want to add some chilling elements to your final tent. You could put some bloody handprints on the panels, add some creepy carnival music to the background- just let your mind get weird. Going back to my previous blog about party tips we got a shimmery light to add an ominous green glow to the tent.
 |
| A little ambiance |
Storage
I started building my tent way ahead of time to make party-prep easier which means I can either keep my bedroom looking like a circus or take it down and store it. The former was a little inconvenient so I did the latter. Because your panels are cut to length you need to know what panels go where.Without untying the gathered ends I rolled each of mine up and labelled them in order.
 |
| Rolled up for storage |
 |
| Gathered ends stay tied together |
 |
| End labels |
So there you have it! I'm pre-building my tent in chunks so once it's all up for the party I'll do my best to get photos of the final product the day of. Also stay posted for more blogs as planning and prepping continues. It's going to be epic!
