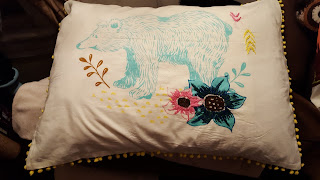
I'm not a big fan of the overly matchy-matchy bed sets so for awhile I've been trying to figure out what to use for pillow shams that would go with our multi-colored, nebula duvet cover. Not finding anything I really liked I finally saw some cute pillowcases online that sparked an idea. With some embroidery flourishes and added details I could make some regular pillowcases into the shams.
What I Needed:
- Embroidery hoop
- Embroidery thread and needle
- Pom fringe (or any other kind of fringe)
- 4 fabric squares (Each wider than half the case width so they overlap in the middle and slightly longer to create a hem)
- Hem tape
- Iron and ironing board
- Scissors
Embroidery
The first thing I did was decide what parts if the case i wanted to embroider. For the bear case it was the flowers and some designs, for the fox it was sections of the tail and the eyes and nose. I stitched through only the single layer of fabric so the threads will be hidden away in the final product. There are lots of amazing crewel embroidery techniques but I decided to keep it pretty simple with the basic ones I already knew. For the flower I decided to use french knots to fill in the center of the flower and a satin stitch consisting of a thread color mix for the petal details:
I wanted to make sure my satin stitched wouldn't get loose and snag so when I finished I weaved a single thread through the strands to keep it from pulling.
After realizing how long the embroidery was going to take I decided to cut down on my ambition for the majority of the fox tail and just picked a few sections to satin stitch and again mixed thread colors to match as close as I could:
Backing
Luckily I already had a set of quilting squares I got as a set from a fabric store that would work perfectly with these pillowcases. I decided a center insert slot with two pieces of fabric of alternating colors and patterns. I used the hem tape to create a nice clean edged on all the pieces that would be where the pillow insert opening is:
I doubled folded the edge so the loose threads would be hidden and once I pinned where the hem was going to go I ironed it lightly to keep the creases:
Next I laid a strip of the hem tape under the fold and then ironed it on both sides according to the instructions. My iron has a steam setting and that's what really made the tape melt and adhere.
Pom Fringe
Before I began to add the fringe I closed up my pillowcase opening with a length of hem tape to keep all the rough embroidery threads on the underside concealed.
Originally I was going to use different colors for each sham but decided that since I used yellow in both already that I'd make the fringe the same color. I measured out the lengths of fringe and tape for each side and then cut the tape lengths up the middle to attach the fringe to the back of pillowcase as close to the edge as possible:
Once the whole pillow case was done I again measured out lengths of hem tape but didn't split them this time. On a short side I lined up the hem tape on top of the fringe, again as close to the edge as possible:
Attaching the Backing
I laid the raw edge of my backing fabric (opposite the hemmed edge for the opening) on top of the fringe, good side down, as lightly as possible and making sure none of the hem tape was exposed. Going a few inches at a time to keep it lined up, I sealed it with the iron:
At the corners I folded in as much as possible so the corners would stay neat and continued with the first backing piece on all three sides. When I did the second piece I layered it on top of the first where they overlap.
*In hindsight I should've tucked the first piece into the hem of the second to make it neater but now I know for next time*
Because I knew the corner on the top piece was going to have some added stress I decided to use some embroidery thread to make a little decorative stitch through both backing pieces for reinforcement.
Finished Products
I was pretty pleased how each sham turned out and they ended up coordinating pretty well:
I think the embroidery details were a really nice touch to make them look like more than just pillowcases. I've always loved crewel embroidery and was lucky enough to have my grandma teach me how to get started but it's not too hard to learn if you hit up you tube and practice with some basic patterns. It's a great way to add a little bit of a personal touch from pillows to tea towels, sweaters, scarves, or sheets.


